Categories
Uncategorized

Change Date of a File on a Mac

So amazing and easy to do!

I’m kind of OCD (Obsessive Compulsive Disorder). I want things right, in their proper place. Files on a computer is no different. I can label files all day long with a date, such as “Filename 20210926” and it will be very easy to sort with the other files in the folder (aka directory), presuming they have the same surname. Filename 20210926 will sort well with Filename 20210826, but try sorting it with Oldname 20210915, and you’re not going to have much luck.

BUT! If you sort by the Created By date or the Modified By date, you can have, perhaps, a little more luck. That’s if you created the files in the correct order. I didn’t, so I had a problem.

It is unbelievably easy to change the date! Easy, if you’re okay with using the Terminal program which comes with every Mac computer. It’s not user-friendly. It reminds me of the old DOS days. Actually, this command is from UNIX, which I understand pre-dates DOS by about ten years.
Type this into Terminal:

touch -t YYYYMMDDhhmm 

Use Finder to find the file you want to change. Drag it into Terminal. Press ENTER/RETURN, and voila! It happens.

Full credit goes to the folks over at CHRON.com which gave me these simple instructions. Their page has a whole lot more detail on the matter. I’m just so excited to get it done!
Categories
Computers Mac

Unable to Launch Adobe as you Do Not Have Sufficient Permissions

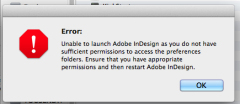
In launching Adobe programs, you get the error, “Unable to launch adobe indesign as you do not have sufficient permissions”.
LiveChat with Adobe Support recommends:

Adobe: As I understand you are not able to launch CC apps since it is giving error “Unable to launch Adobe InDesign as you lack sufficient permissions to access the preferences folders”. Is that correct?
Paul: Yes
Adobe: Please open a Finder window. Choose Go > Go To Folder. Type ~/library and you will get Preferences folder.
Paul: In Library now
Adobe: Are you able to find preferences folder?
Paul: yes
Adobe: Control-click the folder and choose Get Info.
Adobe: Expand the Sharing & Permissions section.
Adobe: Click the lock icon in the lower-right corner. Enter your administrator user name and password when prompted, and then click OK.
Paul: done
Adobe: Please click on + icon and add the Admin and all users showing.
Paul: done
Adobe: Set permission for all users and admin as read/write
Adobe: Click the Gear icon, and select Apply to Enclosed Item
Paul: to each of the individual users and groups?
Paul: one at a time?
Paul: I’ve done it.
Adobe: Please open a Finder window. Choose Go > Go To Folder. Type ~/library/Application support and give full permission to Adobe folder.
Paul: That’s completed… I’ve added all the users and groups, given each ‘Read and Write” and extended the permissions to all enclosed items.
Adobe: Now please open a Finder window. Choose Go > Go To Folder. Type /library/Application support and give full permission to Adobe folder.
Paul: OK, I understand… I am proceeding with your instruction.
Adobe: Thank you.
Paul: I’m finished.
Adobe: Please close all Adobe Applications and then launch InDesign CC and let me know the result.
Paul: OK… looking good so far Mohammed… fingers crossed!
Paul: Thanks Mohammed… it’s launched!
Adobe: Excellent, I am so happy to hear this from you.
Adobe: I certainly appreciate your patience in this process.
Paul: And I yours.

Some users have also found success with doing the same to the Cache folder.

Categories
Apple Computers Mac Microsoft Software

How to BCC yourself in Microsoft Outlook

BCC your e-mail to yourself in Microsoft Outlook!
I’ve been having a hard time finding out how to automatically BCC yourself in Microsoft Outlook for Mac 2015/16, and it is simply so easy!

Simply click on the Outlook menu and Preferences.
Choosing Outlook > Preferences

Choose Composing
Outlook Preferences Menu

Finally, mark the box “When sending messages, automatically BCC myself”
You can also choose to CC yourself, with the dropdown menu, but not both.
Composing Menu with BCC yourself

That’s it!
So simple! I’m banging my head against the wall.
However, I thought to write it down and post it here for all to see.

Oh, and if you don’t yet have Microsoft Outlook for Mac, I highly recommend it. You can get it here for a low, low price:

Enjoy!